Get a Faster Site with a Self-hosted CDN for WordPress & W3 Total Cache
A self-hosted CDN for WordPress with W3 Total Cache will help make your site faster. Lowering the time it takes pages to load gets users into your content and engaged much quicker.
You probably didn’t realize but it’s actually possible with most hosting services to make your own CDN. Normally when you think of a content delivery network you imagine an entire network of servers . That’s exactly how the premium ones work.
A self-hosted CDN could be housed on many different servers too – but it’s commonly only in a single location. A more descriptive term for this kind of use would be as a statics domain.
As soon as you have a self-hosted CDN to serve your static files from you’re pagespeed scores will go up instantly because you’ll benefit from parallel connections in the browser & cookieless serving of the files.
What is a CDN & what are the Benefits?
A CDN is a Content Delivery Network. A set of quick servers dotted around the globe that your static resources get served from.
Static resources are things like image files, video, CSS & JS files and font files. That means all your uploads as well as a bunch of your theme files and the WP core is static. Those can all be served from a CDN. Once your files are on the CDN then you just need to rewrite the file location to point to the new domain.
There’s 2 main ways you can propagate files to a CDN. Origin push or origin pull.
Origin push requires that you send the files before you rewrite the file location to point to the new domain. If you don’t push all files to the CDN then the user will get a 404 when requesting the files from it.
Origin pull does not require you to add the files to the new location before rewrite. That’s because when it receives a request for a file that it doesn’t have it requests it from the origin server and pulls it over it’s self. It then saves a copy to use next time the file is requested.
Origin push techniques are usually less technical than origin pull so we’ll be adding our content via a push.
Serving static resources from a CDN accomplishes 3 things. When all done together they could potentially improve your page loading speeds dramatically.
- You content is loaded from the nearest server to the request, lowering ping time and getting it to the user faster.
- Your static content is loaded from a separate domain to your dynamic content. This increases speed by allowing you to have more connections at once. There’s a limit to how many requests you make per connection so if it’s all coming from a single domain then there is a slight delay to the time you can make the request.
- A CDN serves everything from a cookieless domain so there’s no overheads involved in the download, you just get the resource and nothing else.
The big benefit of using a premium service over self-hosting is that they have multiple servers all around the world that are configured to purely serve static content. They employ geographical targeting techniques on the DSN lookup, load balancing for stability and use Edge-Server technology (caching on the edge means that they’re caching it at your ISP where possible – everything has to go through your ISP to reach you, if it’s already cached on those server it means it doesn’t have to arrive from the wider internet. It’s basically right on the ‘edge’ of your connection). All of that combined means they are sure that your content gets where it needs to be… and fast.
What A Self-Hosted CDN Is
A self-hosted CDN is one that you create for the purpose of serving up your static content using parallel connections. Often it’s on the same server as the main domain and not duplicated across many servers and locations like a premium CDN is.
You could set it up to be in multiple locations but that would involve multiple servers and a way to make sure that the content on each server is the same (only practical when your using origin pull techniques).
Even a self-hosted system on your existing hosting account can still benefit your site a ton. Although you loose some of the features of a premium hosting service you still get 2 huge benefits.
- Your static content is still served from a cookieless domain
- It’s served from a different hostname (domain) to your main domain and users benefit from parallel connections.
Speed Results Without Optimizations
 When I done a test on my site with WebPageTest.org the results I got were an F grade for almost everything. I expected bad results due to me turning off all the optimizations.
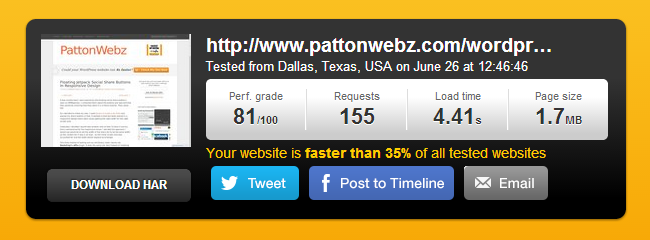
Doing multiple speed tests I received consistent scores like ones in the screenshot below. Pages are fully loaded in between 4 and 5 seconds which isn’t actually all that bad.
There’s 2 things that worry me about the results I get when I test my speed.
- “Your website is faster than 35% of all tested websites” that means more than half of the sites tested are faster than mine.
- “Load time 4.41s” – over 4 seconds is bad.
In testing I’ve actually found that as early as 2 seconds people can start to drop off.
Create Self-Hosted CDN for W3 Total Cache
The performance and caching plugin W3 Total Cache makes it easy to configure WordPress to use a CDN – using a self-hosted or premium content delivery network.
Most of the work to make a CDN takes place at your hosting account and, because we’re using an origin push technique the plugin only needs an ftp user capable of accessing the files on your hosting service.
The first thing to do is create a sub-domain to hold the files. I used to have Plesk panel installed on my server and when a sub-domain is created Plesk automatically adds an A record to the DNS for the new subdomain, I’m pretty sure cPanel has a similar behavior and Webmin (currently on my server) does the same.
Go ahead and use your hosting panel to make an empty sub-domain.
You can still do all of this without access to any hosting panel if you have ssh access and are capable of setting up a virtual host, adding users and modifying DNS records.
Additional Domains
This step is optional (note that more is not always better so start with a single hostname for the CDN).
I’m going to create an additional 3 sub-domains and point the virtual hosts to the exact same directory on the server as the primary sub-domain.
I initially planned to create 3 additional CNAME records at the DNS and point them to the sub-domain domain because CNAMEs are what W3 Total Cache suggests. Instead I opted to use another 3 A records.
There is probably a reason why CNAME records are suggested over A records – but a CNAME requires an additional lookup to access and I wanted to eliminate that. You’ll see shortly why I’ve added the extra 3 sub-domains.
You need just a single sub-domain – it’s how most people do it – however I know that I have A LOT of CSS & JS files on this site and I will want them to be served from different domains so they all benefit from paralleization.
A better course of action would be to combine and minify them all into as few files as possible (this is actually what I normally do) but doing that gives me some huge files to serve.
 These are the sub-domains I ended up using. All 4 of them point to the same CDN directory on the server. This way it only takes a single user to push content to them yet it’s accessible from 4 different hostnames.
Once you have domains set up and a user that has access to them you’re ready to configure it in the W3 Total Cache plugin.
W3 Total Cache Self-Hosted CDN Settings
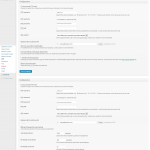 On the General Settings tab of W3 Total Cache scroll down to the box that asks about your CDN type. Set it to self-hosted/ftp and then go to the CDN page and enter hostname and ftp details.
Most of the default settings are fine, I made a few minor adjustments to mine which you can see by clicking the thumbnail (sorry, the screencapture had problems grabbing the whole screen. You are able to see all the settings – bar the additional hostnames I entered).
Ordinarily people put in a single domain and that’s fine but because I’ve created multiple sub-domains for it I will enter all 4.
W3 Total Cache will use a different hostname for different files linked in different places. CSS will use 1 hostname and the JS files will use the other 3, depending on where they are linked in the file.
Before you turn on the CDN there is one thing left to do. You need to upload your files to your self-hosted CDN. This is the origin push I spoke of earlier.
At the top of the CDN config page there are buttons which open windows that allow you to upload all your files in each file-group. Click each of the buttons and initiate the file transfer for them.
Turn On Your Self-Hosted CDN
Once you’ve set everything up in the plugin and uploaded your files you’re ready to turn on the CDN.
Navigate to the General Settings page from W3 and set the CDN to Self-hosted / File Transfer Protocol Upload tick the Enabled checkbox and then click save.
At that point you’re now running your own CDN to serve your static content. Let’s check the speed of the site after activating the CDN and compare it to the score above.
One point better on the Performance Grade due to using the CDN and almost a second off the load time. That puts the page below the 4 second mark but it’s still slower than 67% of the pages the tested so I’m not happy with that. I want it faster.
Even if you get respectable scores you should still strive to make it even faster. There’s still a lot I can do with the site to speed it up even more.
If you remember at the beginning of this post I said that I had turned off all optimizations on the site to demo the benefits of a self-hosted CDN. Below is a test from before I turned them off. All of the optimizations done are server-side.
See the difference? Still a similar amount of page requests, still the same page size but the load time is 2/3 faster than before and I save about 3 seconds per page load. That’s massive!
Plus it makes my site faster than 3/4 of the sites tested. That’s more like the kind of results I want to see.
Note that the performance grade isn’t much better. That’s because there’s still even more improvements that could be done.
Although I’ve yet to implement proper minification and combining of the CSS and JS files when I done a basic test the total requests made was 90 and the size of the page was 1.1MB. 60 requests and half a megabyte less data per page load. Load time was 1.4 seconds.
Even when you get good scores there’s always ways to improve the speed of your pages a little more. Make sure to run some tests on your site and check what your scores are like.
Some of the tools you can use for testing are:
- Google Analytics & Piwik Analytics
- Both these analytics platforms are great for getting end user page speed timings.
- Google Pagespeed Insights
- This tool tests your page against some of the top performance best practice rules. Additionally it also provides some helpful advice for optimizing for mobile users.
- Pingdom
- A great on-demand test for checking page loading time. It gives a nice waterfall of when each request is made and how long it takes to receive it.
- New Relic
- This is a full app/server monitoring suite. It takes all kinds of data from your server and site and loads it into some very nice reports. It can tell you not only which pages are slow but what part of the code is making it slow.






Wow amazing load time didn’t know about the self host feature . i get like 2.06s when i optimized my blog and i only use w3t and cloudflare but i really like the speed you’re getting from the sled host cdn so in the near future i’ll begin testing . Thanks for the article
Osei, Cloudflare would be faster than a self-hosted CDN. I get 3.6 seconds with a self-hosted CDN but it’s the other optimizations I perform server-side that gets it down to 1.71s. Your 2 seconds is pretty damn fast tho, man. Anything under 4 seconds is normally considered as a fairly good speed, especially when it’s powered with WordPress. Are you on a shared host?
My set-up is W3tc with the self-hosted CDN I made in this post. The basic config I have with W3 is to use an opcode cache (I’m using APC but from tests I done yesterday it looks like xAccelerator is slightly faster) for objects and database queries and obviously I have it configured to use the CDN but that’s basically it. The rest of the optimizations are handled by Google’s Mod Pagespeed.
mod_pagespeed handles setting headers for browser caching, it combines and minifys css and js files and collapses all the whitespace in the html then it serves it all with gzip compression. It also optimizes my images, in-lines small css and defers javascript to the footer.
And I keep the mod_pagespeed cache in a large tmpfs which means it’s in RAM 100% of the time ready to serve 🙂
You do need to have access to a VPS/Dedicated Server to install APC and Mod_Pagespeed tho.
A friend is doing me a big favour and gave me hosting also conrtol over the server i learned quite a few things about linux servers over the years so its real easy to optimize it 🙂 also there’s about less than 10 websites on the server my settings are basic just w3t using the disk option ,WP Minify to combine the css and the js then finally cloudflare 🙂 another thing you wont believe this is a godaddy server 😀
Friends are awesome haha! Until a few weeks ago I actually would not have believed you that it was a godaddy server but I’ve recently discovered they are much better now than they were 7 years ago when I was a customer 😀
But guess what? Mod_pagespeed is installed on godaddy servers, you just need to tick a box and turn it on 🙂 That might be why you got the 2s load speed but if it’s still not turned on then you have a few more optimizations that can be done without any work on your part.
Just google how to turn it on and check if it’s on. If not turn it on a get the free boost.
You can also turn on a few additional optimizations through .htaccess rules, like combine css, defer js and collapse whitespace. Then you can use beacons to measure load speed and also add your google analytics details and do content experiments with it. All good stuff 😀
If you have root access I also highly recommend you install an opcode cache because that will help with slow database queries massively by storing the results in RAM.
Thanks for your recommendations and wp minify combines the css also 🙂
You’re very welcome 🙂
hi, thanks for this, really instructive but don’t work totally for me.
image from my portfolio and 1 other (not all) dont work. w3 cache replace the images blank gifs, impossible to find why
did you have an idea why only 10 images on the 120 i got dont work (showed as well transfered, i can see the file on ftp)
thanks !
Hey,
Not really sure why that is happening. I’m wondering if your maybe doing some kind of image rewriting that might be producing black files for W3 to send. That’d be the first thing I’d check. There’s a couple of other things you might want to check out. On the CDN page of W3 there’s a box that enables Passive Transfer mode. Check that box, save the settings and then try pushing the files over again. Also do the transfer more than once and check if it’s always the same files that fail or if it changes.
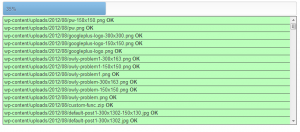
That transfer happens with ajax and you can see the results of the request in the inspector tool. Check that output for errors and see what’s going on during the transfer because you might see something going wrong or timing out. I recently had a problem doing the transfer on a server that was limiting php execution limits to 20 seconds which wasn’t long enough to transfer a batch of files.
Because you can connect to the ftp account you could always try manually uploading the files to the CDN ftp account yourself instead of allowing W3 to do it and see if that works.
I’ve never seen this specific problem of sending empty files so not really sure what the best method to diagnose would be. Sorry I can’t be more helpful or tell you an exact cause but I hope you manage to get it fixed.
Feel free to give me another shout if you want more help definitely let me know how you get on with this.
Nice tutorial William, i have a problem to do that with Bluehost because they not allow me to create sub-domain and cname for the same record. i like CloudFlare which is great but when i activate, it decreased my site score to 77 (originally 99). I tried incapsula too but it blocked all my ftp traffic and i couldn’t fix that. all i need is to serve my static content form a CDN. any suggesting?
Hey Ahmed,
AT Bluehost you can’t create a CNAME record for the sub-domain because it gets an A record by default. Most hosts and panels will create A records when you create a new sub-domain and I think it’s better to use A records over CNAME because it requires 1 less DNS lookup.
But you can use the sub-domain if it has an A record instead of a CNAME as well – W3 Total Cache won’t know the difference! 🙂 As far as W3 is concerned, when using an Self-hosted/FTP CDN, all it needs is an FTP user that has access to the new sub-domain and the hostname (the sub-domain address) to rewrite urls to.
The reason that W3 suggests CNAME records is because they are how people normally create domain ‘aliases’. You can actually get a statics domain running using just an alias that points directly to your main domain if you wanted and do no other configuration or moving of files – but this way you don’t really get the benefits as much as if the content was externally hosted.
If it still doesn’t work after you enter the host and ftp details to your site give me another shout and I’d be happy to offer more help. You can either just leave another comment here or you could send me an email using the contact form on this site (or directly to me if you prefer will@pattonwebz.com).
Hopefully you can get this sorted out soon.
If you don’t mind I would love to check out your site that scores 99, is it the one you entered into the URL field when you commented? I’ve never managed to get a site to score that highly and I’ve been trying for a very long time lol
WOW, Great info .. really, i get it finally to work!.
Also, i tried my tips before 🙂 i disconnected Cloudflare from my Bluehost account and created a new Couldflare account then added back my domain. and so i can create a new CNAME into Cloudflare DNS setting beside the A record that already created for my sub-domain zone. But although, it doesn’t work because Cloudflare still drop the cookies into my domain and all the new sub-domains too. Is there anyway to bypass that?
And again. have you tried incapsula? i really like it and i found it better than cloudflare except for the FTP issue.
and yes, my site is in the the URL field, please check it “http://tools.pingdom.com/fpt/#!/ce77D0/www.elhafez.com”, and tell me what do you think. Now the score back to 99 because i have disables Cloudflare completely. And even though, the score is 99 but the load time is between 2.50 and 3.50. (WT3C active) when i activate Cloudflare the load speed drop down to 1.7 – 1.9 Max! but the score drop down to 77 🙁
I really appreciate you reply and help.
Thank you!
Hi, thanks for this cool tutorial, i really done this before but i have question:
1. There is some trick for W3 cache`s CDN to upload images only in the self-hosted server ?
2. can we change the upload dir like “http://img.mysite.com/site1” ?
3. Is it too slow for the Images upload ? (I`m testing it under localhost)
Thank you.
W3 Total Cache is failing me for some reason, and just telling me the FTP “test failed”. With no further information whatsoever, even though I’m 99% sure the FTP details are correct.
Is there any other plugin that is dedicated to doing just this? Am I better off contacting W3 Total Cache support?
Hey,
Sorry you can’t get this working. It’s been quite some time since I’ve seen an FTP error message on screen for W3 Total Cache but last time I did I was able to see an ajax error in the console. Watch in the console while it does it’s test and see if anything changes in the resources or console tab.
Also try checking (even though it errors on the test) if you can push the files over anyway. I have seen something like that happen in a quirky ftp configuration at BlueHost one time and on GoDaddy WP Managed hosting.
Let me know how you get on.
Thanks William. Its not work for me because too many hassle when i open my cpanel due to sharing with other people. But, because of this i just found other option which is can use google drive as CDN.
For now, still uploading the file into google drive. So, i cant compare the efficiency between self-hosted or google drive CDN.